


 Vendor:
Adjustable speed/RPM limiter with on/off switch for 2T AllPro engines
Adjustable speed/RPM limiter with on/off switch for 2T AllPro engines
Regular price
26,90€
Sale price
26,90€
Regular price
31,46€
-14%
Unit price
per
SKU: AP50CT50.001
Sold out
<p>Earn%20[points_amount]%20when%20completing%20this%20purchase.</p>
- Receive it in 24-48 hours
- Free shipping on orders over €119
Description
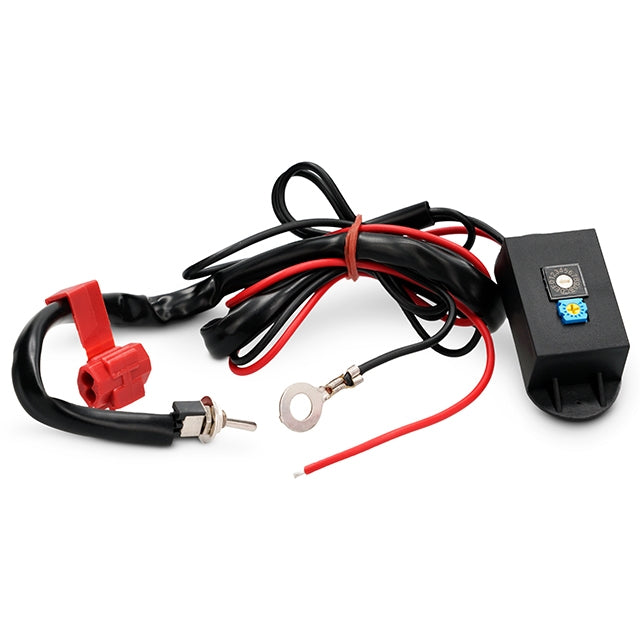
Adjustable speed limiter, with the quality of the Allpro brand.
It is activated via a small switch that can be very easily installed anywhere on the motorcycle. In addition, the limiter is equipped with two potentiometers to select the desired RPM number.
Once the limiter is switched on, the engine cuts off exactly at the selected RPM level.
Installation is simple, you just need to connect a cable between the ignition Pick-Up and the CDI unit. The instructions indicate the cable colour for the most common models.
The second cable is connected to the ground. This is a complete kit.
In addition to the video, we explain how to correctly install the Allpro RPM limiter:
- Find the pick-up power cable, this is very important! Make sure it comes from the pick-up, if it comes from somewhere else it may not work. Connect it to the red cable of the limiter.
– Honda / Peugeot / Kymco / SYM---Yellow/Blue.
– Piaggio---Red.
– Yamaha / MBK / Minarelli Scooter---Red/White (up to 2003)
- Yamaha / MBK / Minarelli Scooter--- Blue/White (from 2003 onwards)
– AM6 / Derbi Senda---Red.. - The black cable of the limiter is ground. To find the ground, you must look for a place where it touches the metal directly; if you connect it to the chassis, make sure to scrape off the paint. If the ground has poor contact, it can cause ignition failures or damage the limiter.
- Make sure the limiter switch is in the ON position (it is marked on the switch); if it is in OFF, the limiter is off.
- It is not enough to just install and set the switch to ON; you need to find the ignition cut-off using the potentiometers mentioned below.
- Start from 0 in a clockwise direction to keep things in order and reach F.
- With the arrow at 0, proceed to turn the blue potentiometer one step at a time. It is important to go point by point; if you turn the whole star, you could burn out the electrical installation.
- If the motorcycle has an RPM gauge, you will see that it does not go beyond a certain RPM. With each CLICK you make on the blue potentiometer, you are looking for the limitation curve that best suits your needs.
- If your motorcycle does not have an RPM gauge, you must follow step no. 7 step by step, but since there is no gauge, you need to test the motorcycle (if it is a geared bike, stretch out a few gears); just revving it will not let you know if it is limited or not.
- If you have tried all the clicks on the blue potentiometer and it does not work, move on to no. 1 of the potentiometer. Proceed to turn the blue potentiometer one step at a time and test each configuration.
- If you have not noticed any effect, go back to step no. 1. Check everything explained above step by step, as we have never found a limiter that does not work. (90% of limiters returned under warranty are not faulty, but rather incorrectly installed)
See the Spare parts for this product